Jigsaw Dataset Generator using Blender Python API
Goals
The goal is to turn the previously completed modelled jigsaw piece into a dataset generator.
- The output image should ideally look like a photo taken from a phone camera.
- You should be able to generate large numbers of images easily.
- The images should be sufficiently varied and randomised.
- Support for various different types of backgrounds, base images, jigsaw piece sizes, etc…
- Each jigsaw piece should be from a random location in the jigsaw.
- Each image will need an associated file to store coordinates of the piece relative to the base image.
- Would be good if the images were generated relatively quickly.
Any Existing Datasets?
“Jigsaw Puzzle Piece Image Segmentation & Placement Prediction” - Dataset consists of manually taken photos of jigsaw pieces that the software then crops. Aware of lighting and camera relation conditions.
Purpose of the Dataset
The primary purpose of this dataset is as follows:
To provide a quantifiable way of evaluating the accuracy of different versions and implementations of a jigsaw solving application.
And the secondary purpose:
To create a varied and diverse array of input data for use in training an AI.
Blender Scripting API with Python
Iteration 1
For iteration 1, the goal is the take the base mesh created in part 1 and apply randomness and modifiers via code.
Base Mesh to Jigsaw via Code
Get the main piece object and define some definitions of where the warp modifier origins should be placed relative to the origin of the scene:
piece = bpy.data.objects["PieceSection"]
modifier_positions = [
    [1,1,0],
    [1,-1,0],
    [-1,-1,0],
    [-1,1,0],

    [0, -1.4, 0],
    [0, 1.4, 0],
    [-1.4, 0, 0],
    [1.4, 0, 0]
]
We also set up some initial global randomness values used throughout the piece:
piece_overall_scale = 1.0 + ((random.random() / 2) - 0.25)
piece_end_scale = piece_overall_scale * 1.0
piece_image_size = 10 + (random.random() * 50)
Adding Warp Randomness
For warp randomness, we can iterate over the modifier_position array and create the origin and target locations and apply that to the base piece using a warp modifier. We also add a little bit of randomisation to the location of the target position so that we can ensure that its working correctly.
# set up objects for modifiers
for i in range(0, 8):
    modifier_froms.append(bpy.data.objects.new("empty", None))
    modifier_tos.append(bpy.data.objects.new("empty", None))
    bpy.context.collection.objects.link(modifier_froms[i])
    bpy.context.collection.objects.link(modifier_tos[i])

    modifier_froms[i].location = modifier_positions[i]
    modifier_tos[i].location.x = modifier_positions[i][0] + random.random() / 4
    modifier_tos[i].location.y = modifier_positions[i][1] + random.random() / 4
    modifier_tos[i].scale.x = piece_end_scale + (random.random() / 8)
    modifier_tos[i].scale.y = piece_end_scale + (random.random() / 8)

    modifier = piece.modifiers.new(name="Warp", type="WARP")
    modifier.falloff_radius = 1.0
    modifier.use_volume_preserve = True
    modifier.object_from = modifier_froms[i]
    modifier.object_to = modifier_tos[i]
Duplicating the Base Piece
Once the warp modifiers are set up, we can then duplicate the base piece 3 times to create the final piece. We also perform a little bit of randomisation here to determine the type of piece. Instead of using an array modifier, we instead just duplicate the piece and rotate it each time. This is what allows us to randomise the side type for each side independently.
for i in range(0, 4):
    new_piece = piece.copy()
    pieces.append(new_piece)

    new_piece.data = piece.data.copy()
    new_piece.rotation_euler[2] = math.radians(i * 90)

    modifier = new_piece.modifiers.new(name="Mask " + str(i), type="MASK")
    modifier.use_smooth = True
    type_index = random.random()
    if (type_index < 0.85):
        type_index = random.random()
        if (type_index < 0.5):
            type_index = "Inward"
        else:
            type_index = "Outward"
    else:
        type_index = "Edge"
    modifier.vertex_group = type_index

    bpy.context.collection.objects.link(new_piece)
    bpy.context.view_layer.objects.active = new_piece
    bpy.ops.object.modifier_apply(modifier="Mask " + str(i))

    new_piece.select_set(True)
We can then join all the meshes together into a single object using the following:
bpy.context.view_layer.objects.active = pieces[0]
bpy.ops.object.join()
We can then also apply all the modifiers to help when it comes to applying a texture:
for modifier in bpy.context.view_layer.objects.active.modifiers:
    bpy.ops.object.modifier_apply(modifier=modifier.name)
Applying Textures
To apply the texture, we first need to unwrap our mesh. For this, we can use Blender’s default unwrapping methods, specifically cube_project(). cube_project works well for this as it allows us to set a size, as well as correct the aspect ratio.
bpy.context.view_layer.objects.active.select_set(True)
bpy.ops.object.mode_set(mode="EDIT")
bpy.ops.mesh.select_all(action="SELECT")
if len(bpy.context.view_layer.objects.active.data.uv_layers) == 0:
    bpy.context.view_layer.objects.active.data.uv_layers.new()
bpy.ops.uv.cube_project(cube_size=piece_image_size, correct_aspect=True, clip_to_bounds=False, scale_to_bounds=False)
bpy.ops.object.mode_set(mode="OBJECT")
The texture can now be applied via the use of a material assigned to the object.
Final Touches
To turn our flat mesh into a full 3D piece, we will need to apply some modifiers to it. We use a solidify modifier to give the mesh some height, then we use a subdivision surface modifier to increase the resolution of the mesh and make it rounded. Finally, we add a bevel modifier to emulate the die-cut nature of jigsaw pieces.
modifier = bpy.context.view_layer.objects.active.modifiers.new(name="Solidify", type="SOLIDIFY")
modifier.thickness = 0.1 + (random.random() / 10)

modifier = bpy.context.view_layer.objects.active.modifiers.new(name="Subdivide", type="SUBSURF")
modifier.levels = 3
modifier.render_levels = 3

modifier = bpy.context.view_layer.objects.active.modifiers.new(name="Bevel", type="BEVEL")
modifier.segments = 4
modifier.width = 0.1
Clean Up
For this script to be able to continuously generate pieces, it will need to be able to clean up after itself so it can run again.
# clean up
bpy.ops.object.select_all(action="DESELECT")
for obj in modifier_froms:
    obj.select_set(True)
for obj in modifier_tos:
    obj.select_set(True)

bpy.ops.object.delete()
Iteration 2
For iteration 2, the goal is to improve iteration 1 by adding environment randomness (not just the jigsaw piece), and allowing the scene to be rendered.
Creating Environment Objects
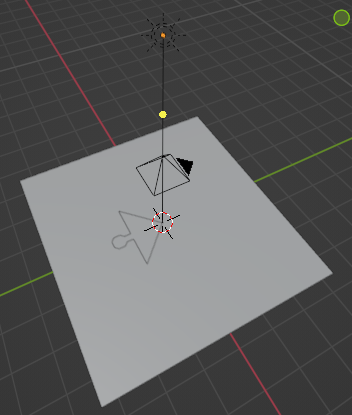
In the Blender file used by the script, I added a floor mesh slightly below the jigsaw piece. I also added a environment light to emulate the sun and a camera pointing down to render the scene. I did not adjust any of the setting within the scene as the goal is to adjust and randomise them via the script.
Randomising the Environment
First, we need references to these new objects in the script:
sun = bpy.data.objects["Sun"]
camera = bpy.data.objects["Camera"]
floor = bpy.data.objects["Floor"]
I then wrote code to randomise the sun angle and light colour. I made sure to average the light colour with the sun’s default colour (white) to ensure the colour is not too extreme and unrealistic. I also randomised the floor’s rotation.
Additionally, I refactored all the code into functions to make it much more easier to read and organise.
def random_env():
    sun.rotation_euler[0] = math.radians(random.randrange(-50, 50))
    sun.rotation_euler[1] = math.radians(random.randrange(-50, 50))
    sun.rotation_euler[2] = math.radians(random.randrange(-50, 50))
    sun.data.energy = random.randrange(1, 6)

    light_random_tint = [random.random(), random.random(), random.random()]

    for i in range(0, 3):
        sun.data.color[i] = (sun.data.color[i] + light_random_tint[i]) / 2

    floor.rotation_euler[2] = math.radians(random.randrange(0, 360))
Randomising Environment Textures
To achieve a realistic look, the floor texture is using a PBR (Physically Based Rendering) material, which means we can achieve a higher level of fidelity than just a flat image.
PBR materials require multiple texture maps:
- Colour (also known as albedo) - The base colour of the texture.
- Displacement - Defines the depth of the pixels of the texture relative to the normal of the surface.
- Normal - Defines the outward direction of each pixel on the texture.
- Roughness - Defines how rough a texture is (how shiny or matte the surface is).
- Metallic - Defines how metallic pixels of the texture are.
All of the PBR texture maps are stored in a “floor materials” directory, with sub-folders for each texture. E.g. /Materials/Floor/1/color.jpg
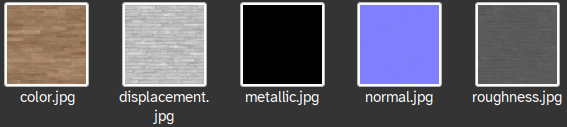
We also define generic “fallback” texture maps in case the texture to be used does not have a texture for that particular map:
To load these textures into Blender, we stored each image path as a key/value pair in a dictionary, which itself in stored within an array.
input_floor_images = []
for image_index in os.listdir(input_floor_images_path):
    if image_index == "fallback":
        continue

    floor_path_full = input_floor_images_path + "/" + image_index + "/"

    temp_dict = {}
    temp_dict = floor_get_from_path(floor_path_full, "color", temp_dict)
    temp_dict = floor_get_from_path(floor_path_full, "displacement", temp_dict)
    temp_dict = floor_get_from_path(floor_path_full, "metallic", temp_dict)
    temp_dict = floor_get_from_path(floor_path_full, "normal", temp_dict)
    temp_dict = floor_get_from_path(floor_path_full, "roughness", temp_dict)

    input_floor_images.append(temp_dict)
The floor_get_from_path function returns a new dictionary with the added value. It currently checks .jpg and .png file extensions.
def floor_get_from_path(path, property, dict):
    new_dict = dict

    if (os.path.exists(path + property + ".jpg")):
        new_dict[property] = path + property + ".jpg"
    if (os.path.exists(path + property + ".png")):
        new_dict[property] = path + property + ".png"

    return new_dict
Once the texture array is fully populated, a random texture can be selected by choosing a random array index.
def random_floor():
    random_index = random.randrange(0, len(input_floor_images))

    apply_to_floor(random_index, "color")
    apply_to_floor(random_index, "displacement")
    apply_to_floor(random_index, "metallic")
    apply_to_floor(random_index, "normal")
    apply_to_floor(random_index, "roughness")

    ...
We can then apply that texture to the floor by changing Blender’s representation of the current floor texture’s image’s file path to our new path, and then reloading the image.
def apply_to_floor(index, property):
    if input_floor_images[index].get(property):
        bpy.data.images[property].filepath = input_floor_images[index][property]
    else:
        bpy.data.images[property].filepath = fallback_material_path + property

    bpy.data.images[property].reload()
Working on Copies
I further modified the code to duplicate the original mesh and operating on that rather than overwriting the original. This helps as it allows us to just delete the generated new piece to get the scene back to the original state so the script can be looped. We can hide the original piece in the scene so it doesn’t show up in renders:
# hide original
piece.hide_set(True)
piece.hide_render = True
Rendering to a File
Here, we render the scene to a temporary directory. Also included in the code below is the main loop, where 16 images are produced.
def render(index):
    bpy.context.scene.render.filepath = "/tmp/jigsaw/" + str(index) + ".png"
    bpy.ops.render.render(write_still = True)

for i in range(0, 16):
    random_env()
    generate_piece(i)
    render(i)
    clean_up()
Iteration 3
The goal for iteration 3 is to randomise the positioning of the texture on the jigsaw piece, as well as output the UV coordinates of the corners as a separate file.
Getting Corner UV Coordinates
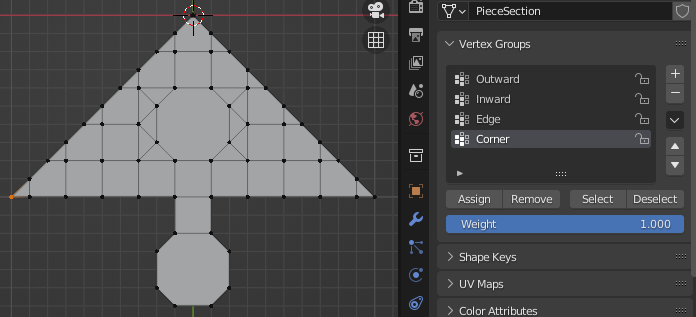
For this data to be useful in a dataset, we must also output where within the base image the jigsaw piece is from. We can do this by getting the UV coordinates of the four corners of the piece and saving it alongside the output. To achieve this we can use vertex groups again to designate the corner vertices of the piece. In the base mesh, this means only assigning a single vertex (as when it is duplicated 3 times, all corners are accounted for.)
The vertex is the single orange one on the far left:
We can get all the vertex coordinates of the corners after all modifiers have been processed (moved by warp modifiers) using the following:
corner_xys = []
for vertex in bpy.context.object.data.vertices:
    for group in vertex.groups:
        if group.group == bpy.context.object.vertex_groups["Corner"].index:
            corner_xys.append(vertex.co.xy)
Better UV Unwrapping
I decided to move over to using bmesh rather than using Blender’s default cube_project unwrap as it provides much more functionality for editing and reading UVs.1 We will still need to perform a simple unwrap using Blender’s default method to start working with bmesh.
bpy.ops.uv.unwrap(method="ANGLE_BASED",
    fill_holes=True, correct_aspect=True,
    use_subsurf_data=False, margin=0.001)
We can then create a bmesh from the UV:
bm = bmesh.from_edit_mesh(bpy.context.active_object.data)
uv_layer = bm.loops.layers.uv.verify()
Because vertices can be part of multiple different UV faces and loops, it is necessary to loop through all available loops and faces in order to modify UVs. The following code corrects the aspect ratio of the unwrapped UV to match the aspect ratio of the base image. It does this in a way that ensures it does not ever extend beyond the 0 to 1 range of UV coordinates. It then applies the previously generated random scale to the texture:
for face in bm.faces:
    for loop in face.loops:
        if bpy.data.images["baseimage"].size[0] < bpy.data.images["baseimage"].size[1]:
            aspect_ratio = bpy.data.images["baseimage"].size[0] / bpy.data.images["baseimage"].size[1]
            loop[uv_layer].uv.y *= aspect_ratio
        else:
            aspect_ratio = bpy.data.images["baseimage"].size[1] / bpy.data.images["baseimage"].size[0]
            loop[uv_layer].uv.x *= aspect_ratio

        loop[uv_layer].uv.x *= piece_overall_scale
        loop[uv_layer].uv.y *= piece_overall_scale
We can also easily apply a random rotation to the UV using bmesh:
bmesh.ops.rotate(bm, cent=[0.5, 0.5, 0.5], matrix=mathutils.Matrix.Rotation(math.radians(random.random() * 360), 3, "Z"))
With the above code, the scale and rotation of the piece will be randomised, but the position will remain constant. To rectify this, we must first find the area that the piece is able to move in. This can be achieved by constructing an AABB (axis-aligned bounding box)2 around the current position of the piece and using the XY size to determine how far the piece can move in the UV XY plane.
uv_min_x = 9999
uv_min_y = 9999
uv_max_x = -9999
uv_max_y = -9999

for face in bm.faces:
    for loop in face.loops:
        if uv_min_x > loop[uv_layer].uv.x:
            uv_min_x = loop[uv_layer].uv.x
        if uv_min_y > loop[uv_layer].uv.y:
            uv_min_y = loop[uv_layer].uv.y
        if uv_max_x < loop[uv_layer].uv.x:
            uv_max_x = loop[uv_layer].uv.x
        if uv_max_y < loop[uv_layer].uv.y:
            uv_max_y = loop[uv_layer].uv.y

uv_x_size = (uv_max_x - uv_min_x)
uv_y_size = (uv_max_y - uv_min_y)
Once we know the size of the piece in UV coordinates, we can generate a random offset to move the piece to (relative to 0, 0):
uv_offset_x = random.uniform(0.0, 1.0 - uv_x_size)
uv_offset_y = random.uniform(0.0, 1.0 - uv_y_size)
We can then apply this random position to the piece with the following:
- Setting the UV XY coordinate to 0, 0
- Adding the generated offset.
- Finally, applying edited UV from
bmeshback to the mesh.
for face in bm.faces:
    for loop in face.loops:
        loop[uv_layer].uv.x -= uv_min_x
        loop[uv_layer].uv.y -= uv_min_y

        loop[uv_layer].uv.x += uv_offset_x
        loop[uv_layer].uv.y += uv_offset_y

bmesh.update_edit_mesh(bpy.context.active_object.data)
Outputting UV Corner Coordinates
We can modify the above for-loop to also write the corner coordinates to a file. This just uses regular Python (no special Blender stuff).
file = open(current_output_path + str(index) + ".csv", "w")
file.write("corner,corner_x,corner_y\n")

corner_count = 0

for face in bm.faces:
    for loop in face.loops:

        ...

        if loop.vert.co.xy in corner_xys:
            corner_xys.remove(loop.vert.co.xy)

            file.write(str(corner_count) + ",")
            corner_count += 1

            file.write(str(loop[uv_layer].uv.x) + ",")
            file.write(str(loop[uv_layer].uv.y) + "\n")

...

file.close()
Finishing Touches
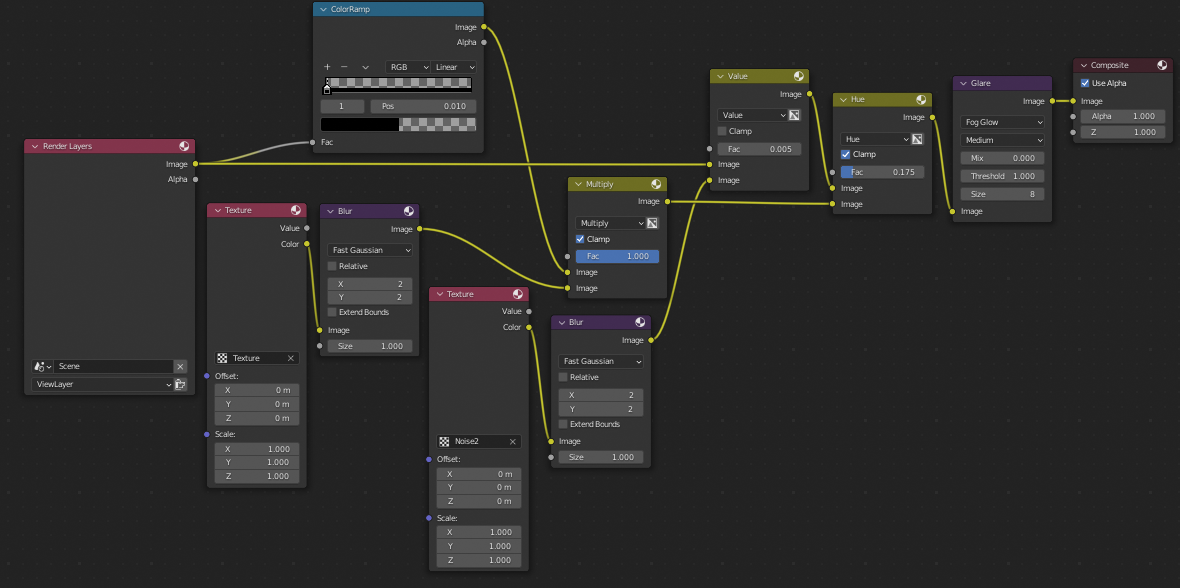
Emulation of Phone Camera
As a final touch, I used Blender compositing to give the image a small amount of noise to emulate a phone camera. I also increased the level of noise in low light level areas much in the same way that phone cameras do.
Additional Randomisation
I added more things that are randomised including sun spread angle and camera location/rotation.
def random_env():
    ...

    sun.data.energy = random.uniform(sun_energy_range[0], sun_energy_range[1])
    sun.data.angle = random.uniform(sun_spread_angle_range_degrees[0], sun_spread_angle_range_degrees[1])

    ...

    camera.location.x += random.uniform(-camera_location_random, camera_location_random)
    camera.location.y += random.uniform(-camera_location_random, camera_location_random)
    camera.location.z += random.uniform(-camera_location_random, camera_location_random)

    camera.rotation_euler.x += math.radians(random.uniform(-camera_rotation_random, camera_rotation_random))
    camera.rotation_euler.y += math.radians(random.uniform(-camera_rotation_random, camera_rotation_random))
    camera.rotation_euler.z += math.radians(random.uniform(-camera_rotation_random, camera_rotation_random))

    camera.data.lens = random.uniform(camera_lens[0], camera_lens[1])

    ...
I also adjusted some material settings on the base piece so the specular value (gives the piece a shiny, laminated look) is also randomised:
piece.material_slots[0].material.node_tree.nodes["Principled BSDF"].inputs["Specular"].default_value = random.uniform(piece_specular_range[0], piece_specular_range[1])
I made sure to reset all of these properties in the clean up function:
def clean_up():
    bpy.ops.object.select_all(action="DESELECT")

    for obj in modifier_froms:
        obj.select_set(True)
    for obj in modifier_tos:
        obj.select_set(True)

    pieces[0].select_set(True)

    bpy.ops.object.delete()

    floor.rotation_euler.z = 0
    floor.scale = [1,1,1]
    camera.location = [0,0,3]
    camera.rotation_euler = [0,0,0]
    camera.data.lens = 25.0
    sun.rotation_euler = [0,0,0]
    sun.data.color = [1,1,1]
    sun.data.energy = 5
    sun.data.angle = 0.526

    piece.hide_set(False)
    piece.hide_render = False

    piece.modifiers.clear()

    mat = piece.material_slots[0].material.node_tree.nodes["Principled BSDF"].inputs["Specular"].default_value = 0.0

    modifier_tos.clear()
    modifier_froms.clear()
    pieces.clear()
Changing Base Images
I tidied up the script and added the ability to select different base images much in the same way that different floors are selected:
input_base_images = []
for image in os.listdir(input_base_images_path):
    if os.path.isdir(input_base_images_path + "/" + image):
        continue
    input_base_images.append(input_base_images_path + "/" + image)
And to select an image we can simply change the file path and reload.
bpy.data.images["baseimage"].filepath = input_base_images[base_index]
bpy.data.images["baseimage"].reload()
User Input
Users can now select how many images they want to generate per base image:
print("Images per base: (there are " + str(len(input_base_images)) + " bases)")
images_per_base = int(input())

for base_index in range(0, len(input_base_images)):
    ...
Outputs
The output of the script is separated by base image:
“0.csv”:
corner,corner_x,corner_y
0,0.4706724286079407,0.7855406403541565
1,0.47143152356147766,0.8599005937576294
2,0.4137100577354431,0.7901914119720459
3,0.4135684370994568,0.8609039783477783
“0.png”:
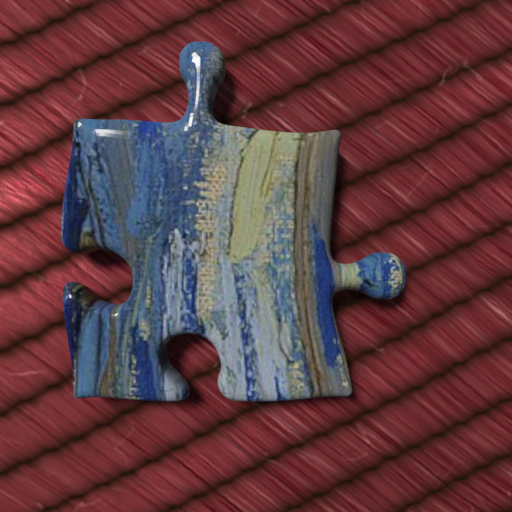
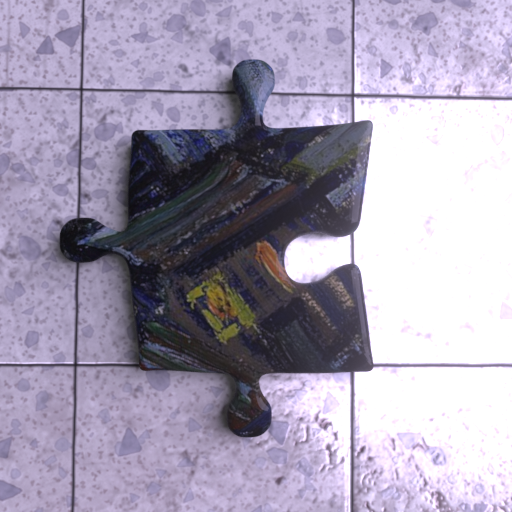
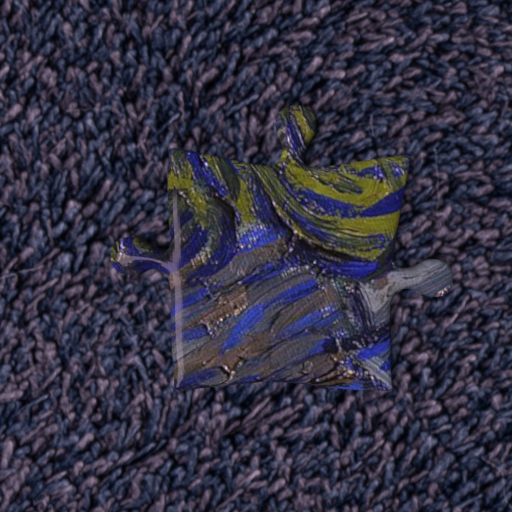
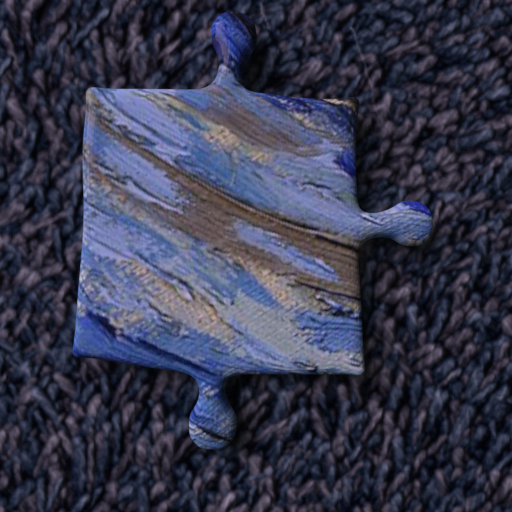
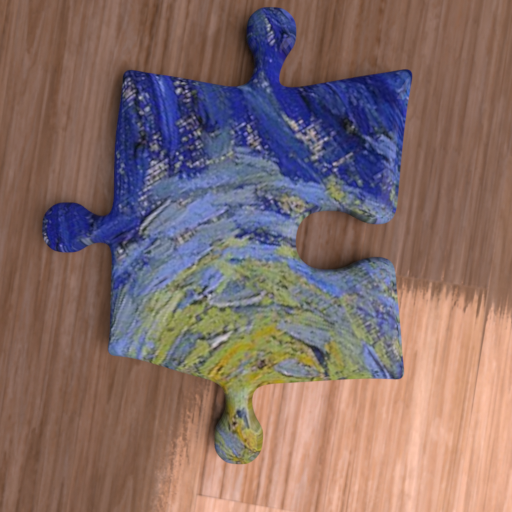
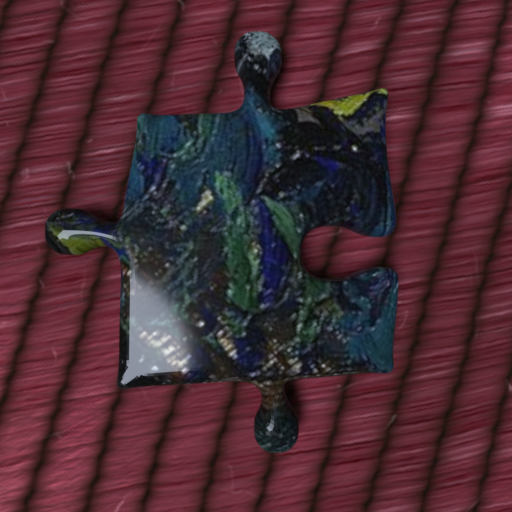
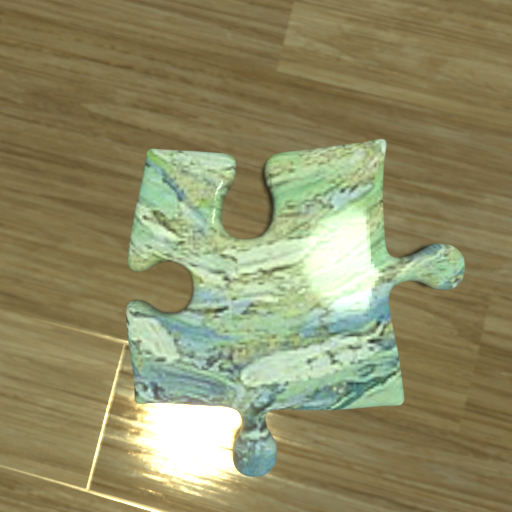
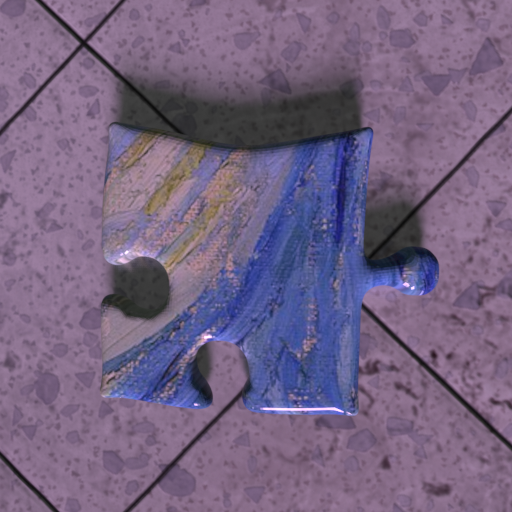
Here is a selection of output jigsaw pieces:
GitHub
Notes and Sources
PBR textures sourced from: https://ambientcg.com/
Base images are public domain or CC0 photos/artwork sourced from various websites.